Set Up Credit Card Payments in 4 Easy Steps
About 30% of patients walk out of offices without paying their balance, and receive on average three statements from their providers before settling their bill[1]. This causes you, the provider, to not get paid adequately and in a timely manner for your expertise. It creates stress and more work for your practice and your billing department. It may also cost your patients in late payment fees.
So what helps getting a bill paid on time? When a bill is easy to pay. Helping your patients to pay their bills on time will help your practice run much more smoothly and improve your cash flow!
Practices sign up for auto deposits from insurance companies, but how about with their patients? These days, accepting credit cards is a must. Fortunately, MediBill’s system on Kareo has a great feature for that.
Beyond just accepting credit cards from patients, you want to make sure your practice has an intuitive system for accepting credit cards and processing payments. Accessible by both the clinical and the Practice Management sides, Kareo’s credit card processing feature is an easy, keyboard-entry only system (no card swiping necessary!). Being integrated, the card processing feature displays the patient’s current balance. The patient has the option to pay their current balance or some other amount towards their bills.
Your billing department also appreciates this feature because they are automatically notified that a payment has been made. This improves accuracy and helps avoid errors or misapplications in payments.
Finally, an integrated system like MediBill’s has the ability to email your patients secure links that enable them to enter their own credit card information and pay their balance as easily as checking out an online shopping cart.
Ready to set it up?
Here’s a step-by-step guide to setting up credit card payment inside Kareo!
Enabling Credit Card Payments Feature in Kareo
Before you’re able to process credit card payments, first you must enable the credit card portal feature. This can be done only on the practice management side.
Step 1. Log into your practice management.
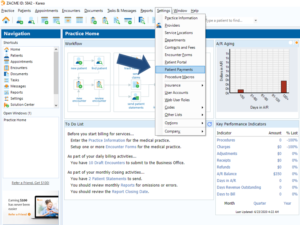
Step 2. Go to settings. Click on “Patient Payments” (click below image to enlarge).
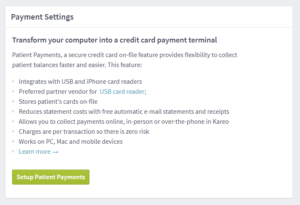
Step 3. The screen below is what comes up when you click on “Patient Payments”. Review the information provided, then click “Setup Patient Payments”.
Step 4. Kareo then prompts you to set up a merchant account with the credit card processor Stripe, which will allow you to accept credit card payments. Filling in these prompts sets up your account with Stripe.
Key prompts to keep in mind:
- Stripe will ask for key information regarding the principal of your practice. If you are a sole proprietor, that would be you! Stripe needs the principal’s phone number, date of birth and home address.
- Under the credit card statement details section, after the “statement descriptor” (where you enter your practice’s name as it would appear on your patient’s credit card statement), be sure to enter your practice’s phone number in the Support phone number field in this area.
- Enter the bank details as prompted.
- In the 2-step authentication section (required), the easiest option is the “Use SMS” button. Enter your own cell phone number to authenticate your account, and Stripe will send you a confirmation code. Enter the confirmation code.
- At the end of the questionnaire, you’ll be prompted to save your account: “Almost done! Save your Stripe Account”. Here, Stripe asks for an email and password.
IMPORTANT! Write down the email and password you enter here. We recommend you start a file and call it “Kareo Credit Card/Stripe” and put this information (email+password) in it. Your email and password are your login credentials to access your account at Stripe. You will need to log into your Stripe account occasionally to review activity, or to issue a patient a refund. (NB: To run a patient’s credit cards and process payments in Kareo, you do not log into your Stripe account).
After you activate your Stripe account, you will be returned to the patient payment screen. You are now ready to accept credit card payments! Stay tuned for our next blog post that gives a tutorial on how to accept credit card payments.
[1] MGMA Connexion, April 2010.


